Last updated on the 25th October 2009 If you are using digital modes, you have most of the things
required to run fdmdv already (TRX, PC, interface). All you have to do
to add digital
voice - and in particular the fdmdv flavour - is the following:
1. Buy yourself a USB soundcard plus
a headphone/microphone set,
often called a "dongle".
Sometimes these are integrated (for instance Jaycar AA-2032).
2. Download the software (free),
at the moment there are only Windows versions available:
URL to download V1.3: www.n1su.com/fdmdv/
URL to download V1.2: ik4hdq.net/fdmdv.htm
Version 1.3 is the newer one and uses an open source codec. Version 1.2
employs the better but proprietary
"Melp" codec, which is licensed for free use by the U.S. Government,
but not by Radio Amateurs. It
is still used outside the USA.
3. Install the hardware:
This will be done automatically. Plug in the USB soundcard (dongle).
Windows will detect it.
4. Install the software:
For version 1.3 you should have the
following files in a separate directory (folder):
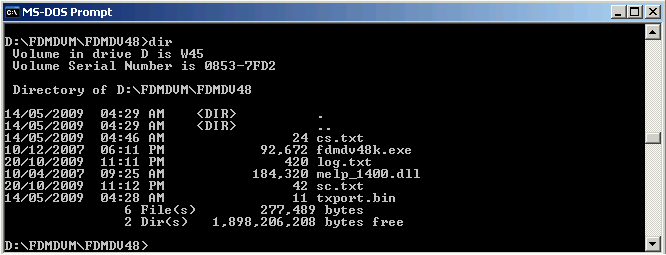
For version 1.2 you should have
the following files in a separate directory (folder): Note: Don't try to
replace the version 1.3 codec with the "melp" codec.. Even if you
rename the file to codec.dll it doesn't work.
You can have both versions on your PC as long as you use separate
directories. Of course you can only use one version at any given time!
Version 1.3
Version 1.2
Program Set Up:
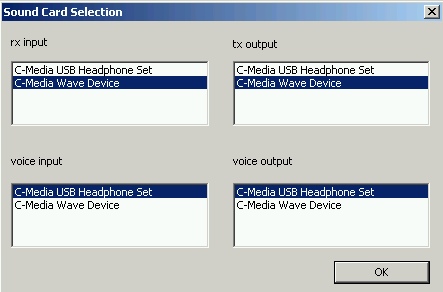
Sound - Select Soundcards as follows:
For
audio
level settings,
use the Windows
mixer: RX Input = Mixer for primary soundcard
Recording Line-In or Mic-In (connect to receiver's speaker) TX Output = Mixer for primary soundcard
Playback Master Volume (connect to transmitter's mic
input) Voice input = Mixer for USB Headphone Set
Recording Mic-In (connect Headphone mic to USB dongle) Voice output
= Mixer for USB
Headphone Set Playback Master Volume (connect Headphomes to USB dongle) Basically it is the identical
setup as other digimodes (like PSK31 or Olivia), just add the USB
dongle for voice I/O. Select
ComPort (PTT): Under
Settings, click on ComPort, and port number, and
then click OK.
Callsign: This is not only the callsign but also additional
information that will be displayed on the bottom info window on your
QSO partner's screen. Keep it short: Call, name and
QTH (max. 80 characters).
Operating Procedures:
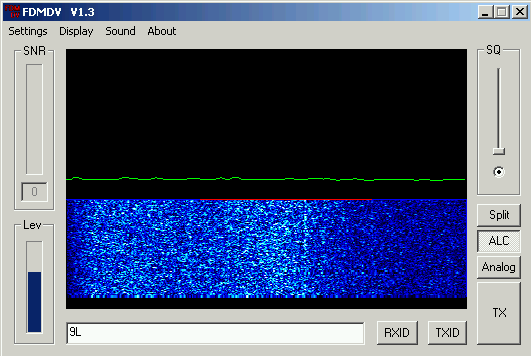
Receiving Digital Voice:
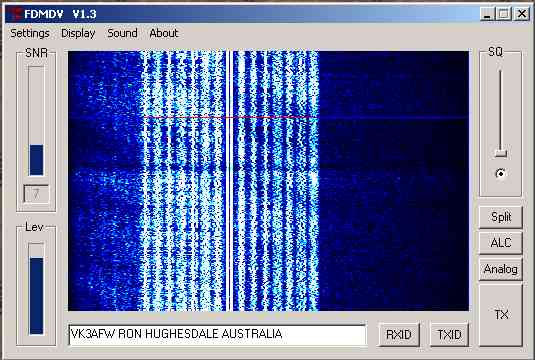
"Waterfall" is the default display for receive and will switch to
"Scope" for monitoring transmit mic audio level.
Tuning must be within a few Hertz for sync. This is done by using
the mouse and the auto- or manual tuning method. Tune the RX so that
the waterfall signal is within the display window. Move the mouse pointer + anywhere on the
display and left click for auto tune.
The 1.1 KHz spectrum bandwidth's horizontal red line will shift and
move to the
received frequency. Sync will be instantaneous and voice decoding will
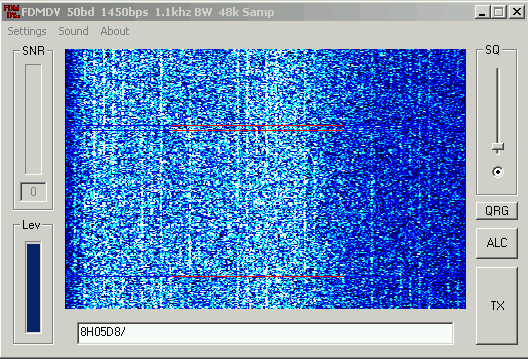
start. If not (normally,
due to low SNR), use manual tune by
moving the mouse pointer + to the center of the
two bright BPSK carriers in
the middle of the signal and right click.
For weak signals and/or when experiencing deep fades, open up the squelch by pulling down
the slider. Default is 50% which is too high for weak signal work.
Adjust with signal present to find the best setting without dropping
decoded speech.
ALC is designed to increase
the average power while limiting the peak power. Theoretically, this
should increase the SNR for weaker signals. This will affect the power
out of the transceiver and its ALC. Reducing power of the
transceiver may be required to avoid ALC distortion and degradation of
the received station's SNR.
Split allows independent
tuning of the RX frequency. With click tuning, off- frequency signals
maybe sync'd without changing the transmit frequency.
RXID-TXID implements F6CTE's
Reed-Solomon derived ID with a sequence of 15 MFSK tones sent at the
start of the transmission. These tones are decoded and identify
the mode (FDMDV) and automatically tune fdmdv. VERSION 1.3 ONLY
Analog changes mode to SSB by
routing audio from the receiver's speaker to the PC headset and
the headset mic to the transmitter's mic input. VERSION 1.3 ONLY
Alert plays a wave file (alert.wav) when RX-ID encodes a TX-ID. This
wave file may be provided by the user or use the sample alert.wav.
Install in the same folder with fdmdv.exe. Retain the same file name
when changing wave files. VERSION 1.3 ONLY
Transmitting Digital Voice:
Click on TX and verify RF output level, then use the scope display
for 75-90% deflection while
speaking in a normal voice into the mic.
The space bar may be used for
PTT control when the TX/RX
button is in focus.
TXID: Enable to send the
Reed-Solomon auto ID signal for FDMDV stations with RXID decoder on. A
sequence of 15 MFSK tones is sent with data decoded by the RXID at the
receiving station. After identified as a valid FDMDV signal, the
receiving station is tuned and synchronized automatically. TXID should
not adversely affect CPU usage.
TX power out: Run 20-25 watts
maximum with a 100w transceiver. Note: This is an
important setting. Attempting to run more power can cause distortion
and will significantly degrade the SNR at the receiving station far
greater than running lower power. If you must run an amplifier, adjust
to about 25% of its maximum power
output. Adjusting power for highest SNR and not highest S-meter reports
will provide better results.
Generally, SNR can fluctuate rapidly on HF paths.
Analog: Enabling will bypass
encoding and decoding for monitoring and transmitting in analog. This
provides a quick way of listening on the frequency (with the
headphones) and when needed, transmitting in analog (SSB) using the
headsets microphone. To transmit, just click on TX and speak in a
normal voice while watching the transceiver for proper drive level in
SSB mode. Note: Since the RX and TX audio is being routed through the sound card, a slight delay caused
by system latency will occur.
Technical:
FDMDV (Frequency Division Multiplex Digital Voice) is based on 15
carriers using the 1400 LPC CODEC. High power in each carrier combined
with a narrow
1.125 KHz bandwidth provide good robustness with fast sync for a near
SSB experience. FDMDV is new and not derived from DRM technology.
Technical Specs: 50 baud 14 QPSK (Quadrature Phase Shift Keying) voice data
                       1 Center BPSK (Binary Phase Shift Keying) carrier with
                       2x power for Auto Tuning and frame indication.
                       1.125 KHz spectrum bandwidth with 75Hz carrier spacing
                       1450 bps data rate
                       1400 bps open LPC CODEC
                        Adjustable Squelch
                        TX ALC boost average power while reducing the peak power
                        No FEC (Forward Error Correction) for fast synchronization.
                        48000 Sample Rate/16-20 bit/AC97 sound card compatible
                        F6CTE s RSID for identifying and synchronizing FDM signals
QRGs Used:
Fdmdv has only one "official" frequency - 14.236 USB.
The required bandwidth is about 1250 Hz.
At the moment your best chance is to arrange a sked.