FreeDV Digital Voice
Last
updated on the 1 st
February 2013
I have an old Windows XP system for digimodes programs that are
hard (if not impossible) to run on Linux - like ROS and the IZ8BLY
programs. This describes set-up and operating procedures for
freeDV ON MY SYSTEM.
I hope to expand on the content as I myself get more familiar with
the program.
If you are using digital modes, you have most of
the things required to run freedDV already (TRX, PC, interface).
All you have to do to add digital voice - and in particular the
freeDV flavour - is the following:
1. Buy yourself a USB
sound-"card" plus a headphone/microphone set,
often called a "dongle". Sometimes these are integrated (for
instance Jaycar AA-2032).
2. Download the software (free), at the moment I
use only the Windows version:
URL to download: http://freedv.org/tiki-index.php
3. Install the hardware:
This will be done automatically. Plug in the USB soundcard
(dongle). Windows will detect it.
4. Install the software:
Unzip the zip file and put the extracted files in a
separate directory (folder):
Create a desktop link:
You can have freeDV and one or both versions of the old
fdmdv on your PC as long as you use separate directories. Of
course you can only use one program at any given time!
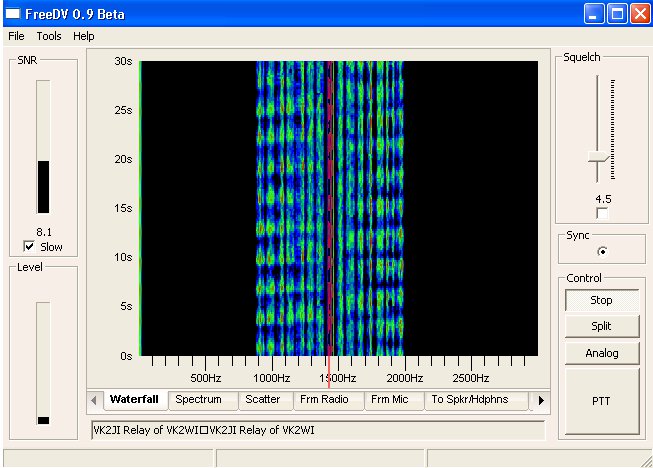
This is how feeDV looks on RX:
Program Set Up:
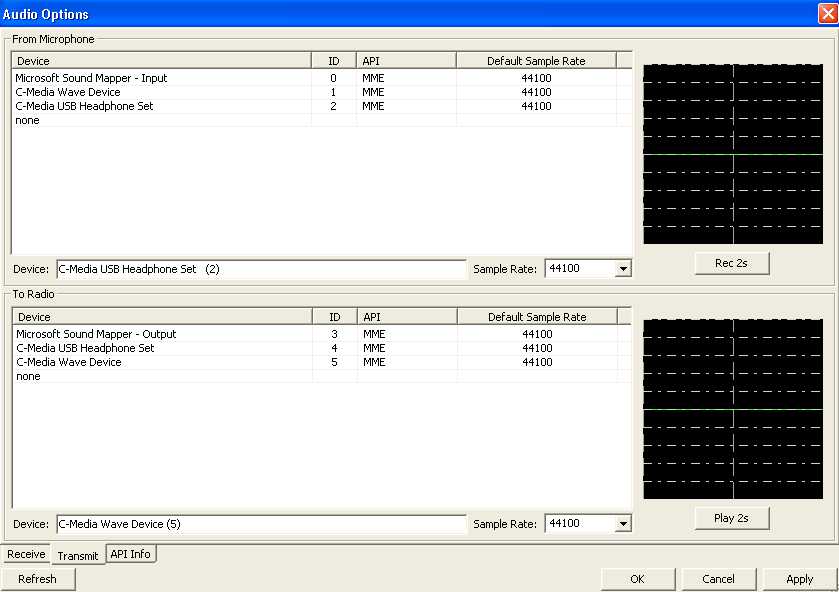
Audio - Select Audio Options as follows.
This is an example from my set-up. I have an integrated
sound system and a USB dongle. The settings are un-intuitive. To
make the program work properly I had to swap the mic and
headphone plugs on the USB dongle! There is no right setting
of the "Audio Options" if this swap is NOT done. So beware
and test thoroughly!
For RX:

For TX:
For
audio level settings,
use the Windows mixer:
NOTE THAT THIS IS MORE COMPLICATED THAN THE OLD FDMDV SETTINGS!
RX Input
= Mixer for primary
soundcard Recording Line-In or Mic-In (connect to receiver's
speaker)
TX Output = Mixer for primary soundcard
Playback Master Volume AND Wave volume (connect to transmitter's
mic input)
Voice
input = Mixer for
USB Headphone Set Recording Mic-In (connect Headphone mic to USB
dongle)
Voice
output = Mixer for
USB Headphone Set Playback Master Volume (connect Headphomes to
USB dongle)
Select
ComPort (PTT): Under
Settings,
click on ComPort, and port number, and then click OK.
Callsign: This is not only the callsign but also
additional information that will be displayed on the bottom info
window on your
QSO partner's screen. Keep it short: Call, name and QTH (max. 80
characters).
Operating Procedures:
Receiving Digital Voice:
"Waterfall" is the default display for receive and will
switch to "Frm Mic" for monitoring transmit mic audio level.
Tuning must be within a few Hertz for sync. This is done by using manual tune by moving the mouse pointer
+ to the center of the two bright BPSK carriers in
the middle of the signal and left click.
For weak signals and/or when experiencing deep fades, open up the squelch by pulling
down the slider. A value of 4.5 is too high for weak signal work.
Adjust with signal present to find the best setting without dropping
decoded speech.
Split allows independent tuning of the RX
frequency. With click tuning, off- frequency signals maybe sync'd
without changing the transmit frequency.
Analog changes mode to SSB by routing audio from
the receiver's speaker to the PC headset and the headset mic
to the transmitter's mic input.
Transmitting Digital Voice:
Click on TX and verify RF output level, then adjust your
voice level for around 50% deflection on the
mic-out display.
TX power out: Run 20-25 watts maximum with a 100w
transceiver.
Note: This is an important setting. Attempting to run more
power can cause distortion and will significantly degrade the SNR at
the receiving station far greater than running lower power. If you
must run an amplifier, adjust to about 25% of its maximum power
output. Adjusting power for highest SNR and not highest S-meter
reports will provide better results.
Generally, SNR can fluctuate rapidly on HF paths.
Analog: Enabling will bypass encoding and decoding
for monitoring and transmitting in analog. This provides a quick way
of listening on the frequency (with the headphones) and when needed,
transmitting in analog (SSB) using the headsets microphone. To
transmit, just click on TX and speak in a normal voice while
watching the transceiver for proper drive level in SSB mode.
Note: Since the RX and TX audio is being routed through the
sound card, a slight delay caused by system latency will occur.
QRGs Used:
FreeDV has only one "official" frequency - 14.236 USB.
There are people (VK ONLY) on 7.199 LSB and 7.130 LSB
also. The required bandwidth is about 1150 Hz. At the
moment your best chance is to arrange a sked.
